How do I replace a serial cable connector?
Serial cables are essential components in many electronic systems, facilitating data transfer between devices. Over time, the connectors on these cables can wear out, get damaged, or become obsolete. As a serial cable supplier, I often encounter customers who are unsure about how to replace a serial cable connector. In this blog post, I'll guide you through the step - by - step process of replacing a serial cable connector, ensuring that you can get your equipment up and running smoothly again.
Understanding Serial Cable Connectors
Before we dive into the replacement process, it's important to understand the different types of serial cable connectors. The most common ones include DB9, DB25, and RS - 485 connectors. Each type has a specific pin configuration, which is crucial for proper communication between devices.
DB9 connectors, for example, are widely used in older computer systems for serial communication. They have 9 pins arranged in a D - shaped housing. DB25 connectors, on the other hand, are larger and have 25 pins. RS - 485 connectors are used for multi - drop serial communication, often in industrial settings.
Tools and Materials Needed
To replace a serial cable connector, you'll need the following tools and materials:
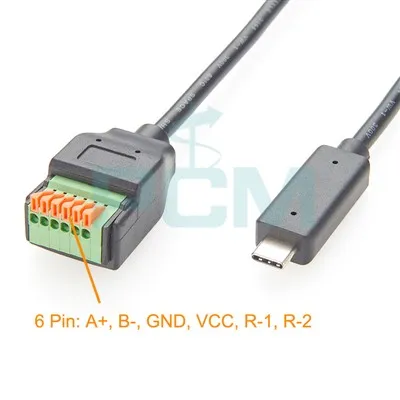
- New Connector: Make sure to choose a connector that matches the type and pin configuration of your existing cable. You can find a wide range of connectors in our store, such as the USB To RS485 Serial Port Converter Adapter Cable With 6Pin Terminal, USB C To DB9 Serial Adapter, and USB 2.0 Hi - Speed To MPSSE Cable.
- Soldering Iron and Solder: A good - quality soldering iron is essential for attaching the wires to the new connector. Make sure to use the right type of solder for electronics.
- Wire Strippers: These are used to remove the insulation from the ends of the wires.
- Crimper (Optional): If your new connector uses crimp - on terminals, you'll need a crimper to attach them.
- Heat Shrink Tubing (Optional): This can be used to insulate the soldered connections and protect them from damage.
Step - by - Step Replacement Process
Step 1: Prepare the Cable
First, cut the damaged connector off the cable. Make sure to leave enough length of the cable for the new connector. Use the wire strippers to remove about 1/4 to 1/2 inch of insulation from the ends of the individual wires. Be careful not to cut the wires themselves.
Step 2: Identify the Wires
Refer to the pinout diagram of your serial cable. This diagram shows which wire corresponds to which pin on the connector. You can usually find the pinout diagram in the equipment's manual or online. Mark the wires with small pieces of tape or use a wire marker to keep track of them.
Step 3: Prepare the New Connector
If your new connector has a housing, separate it into its parts. Some connectors may require you to insert the wires through a strain relief or a backshell before soldering or crimping.
Step 4: Solder or Crimp the Wires
- Soldering: If you're using soldering, heat the soldering iron and apply a small amount of solder to the tip. Then, touch the tip of the soldering iron to the pin on the connector and the exposed wire simultaneously. Once the solder melts, it will flow and create a strong connection between the wire and the pin. Repeat this process for all the wires.
- Crimping: If your connector uses crimp - on terminals, insert each wire into the appropriate terminal. Then, use the crimper to compress the terminal onto the wire. Make sure the crimp is tight and secure.
Step 5: Insulate the Connections
If you're using heat shrink tubing, slide it over the soldered or crimped connections before you make them. After the connections are made, use a heat gun to shrink the tubing, providing insulation and protection.
Step 6: Reassemble the Connector
Put the connector housing back together, making sure all the wires are properly routed and the strain relief is in place.
Testing the Newly Connected Cable
Once you've replaced the connector, it's important to test the cable to make sure it's working properly. Connect the cable to your devices and try to establish a serial communication link. You can use diagnostic software or test equipment to check the data transfer. If there are any issues, double - check your connections and the pinout.
Troubleshooting Tips
- No Communication: If you're not getting any communication, check the pin connections. Make sure all the wires are connected to the correct pins. Also, check for any loose or cold solder joints.
- Intermittent Communication: This could be due to a loose connection or a damaged wire. Inspect the cable for any signs of damage and re - solder or re - crimp the connections if necessary.
- Incorrect Data Transfer: This may indicate a wrong pinout. Refer to the pinout diagram again and make sure the wires are connected correctly.
Conclusion
Replacing a serial cable connector may seem daunting at first, but with the right tools, materials, and a little patience, it's a task that you can easily accomplish. As a serial cable supplier, we are committed to providing you with high - quality connectors and cables to meet your needs. If you have any questions or need further assistance, please don't hesitate to contact us. We are here to help you with your serial cable requirements and look forward to discussing your procurement needs.


References
- Electronics textbooks on serial communication and cable assembly.
- Manufacturer's documentation for serial cable connectors and related equipment.